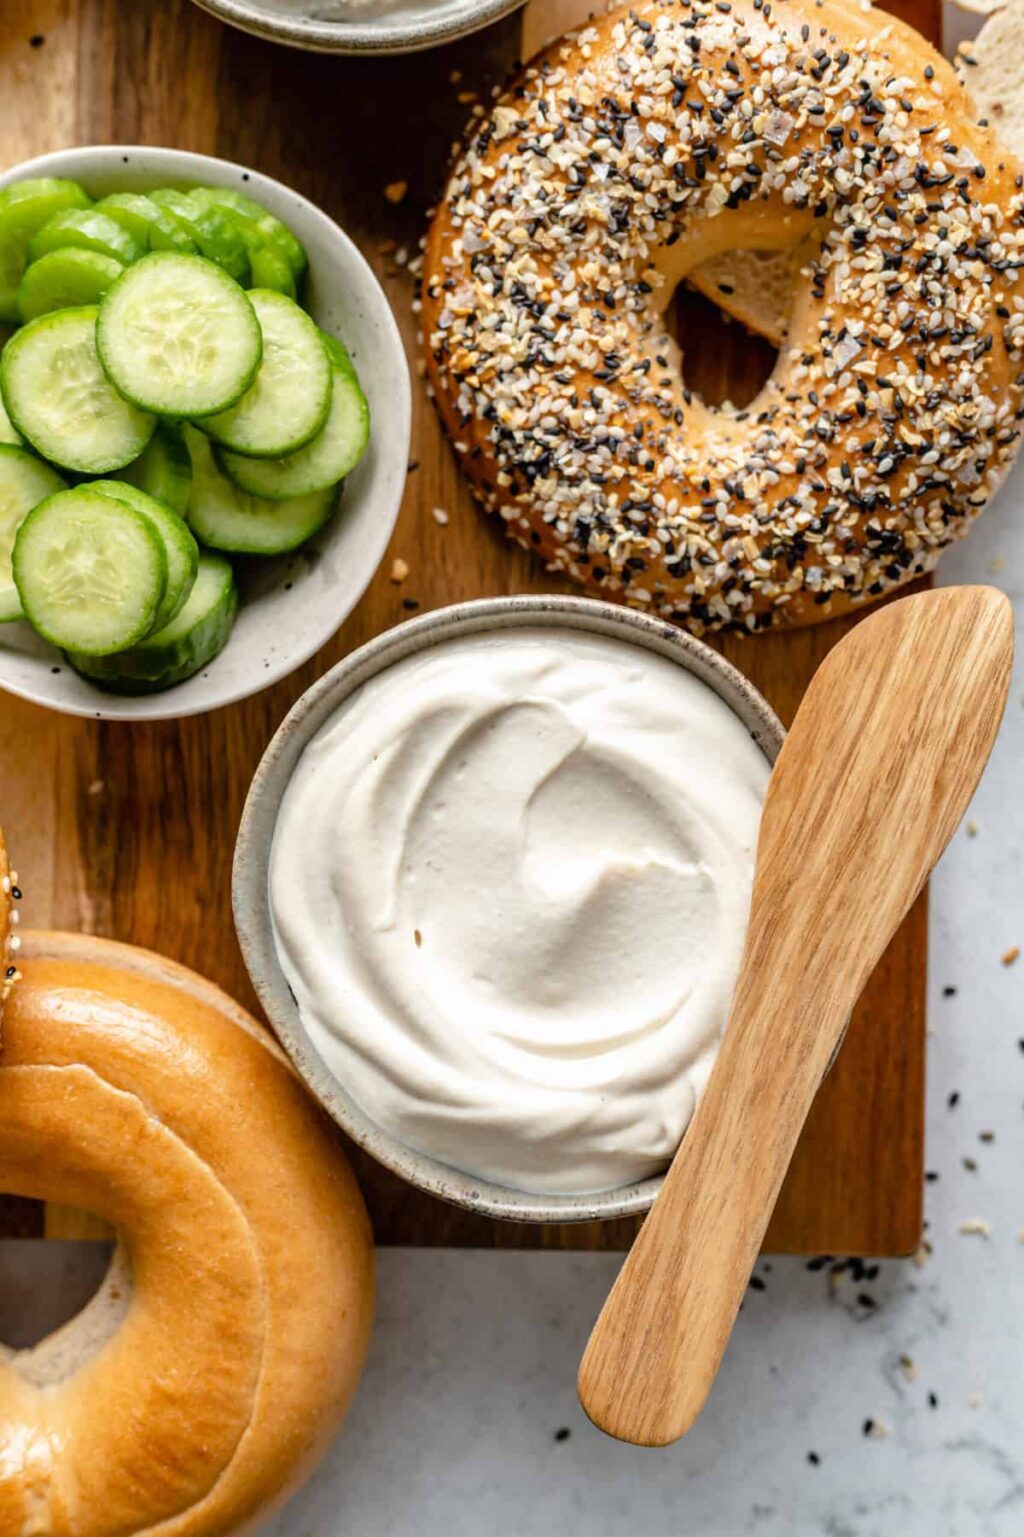
Learn how to make creamy Vegan Cream Cheese with this easy step-by-step guide! Homemade cream cheese is so rich and smooth. It’s perfect for breakfast bagels, snacks, and more! Making your own cream cheese probably sounds pretty labor-intensive, but it’s not, I promise! Basically all you need to do is blend the ingredients together, and then patiently wait for the mixture to settle. But, more on this later. For now, let’s talk about the amazing qualities/versatility of cream cheese! I love being vegan, but, before this recipe, I’ll admit that I missed being able to enjoy cream cheese! Now, I don’t have to because this Vegan Cream Cheese is just as smooth and delicious as regular cream cheese is. There’s another promise. Vegan yogurt and raw cashews combine to create a creamy homemade cream cheese that you can use in pretty much anything! Cheesecakes, frosting, on bagels… you name it, this cream cheese can do it! Why Make Your Own Cream Cheese? There are so many reasons to make your own cream cheese. The main reason is because it is SO tasty. You’ll want to eat it right out of the glass/jar. (I did, anyway!) Here are a couple more reasons to keep in mind: Notes on Ingredients Let’s go over the 5 aforementioned ingredients. They may not seem like they could yield such creamy deliciousness, but I’m here to report that they can! These are the essentials in question: How to Make Vegan Cream Cheese Blend the Ingredients: In a high speed blender, blend all the ingredients together until blended and completely creamy, smooth and incorporated. Scrape down the sides if needed, and blend until combined. Transfer to a Bowl: Pour the contents into a very clean and dry glass bowl or tall jar using a silicone spatula or wooden spatula (not metal). Smooth it down. Let the Cream Cheese Sit: Cover the bowl/jar with some cheesecloth or even a clean dry paper towel and secure with a rubber band. Place in a warm, dry place. (See notes below for tips on this.) Leave the cream cheese undisturbed as much as possible for 24-48 hours. I recommend leaving it for the full 48 hours. Stir the Cream Cheese and Chill It: The mix should be much thicker now and taste a lot cheesier. Stir to combine fully. Cover the jar/bowl or transfer to a new clean jar/bowl and cover and place in your fridge. It should also thicken up in the fridge and you can start using it now! Taste and Adjust: Taste your cream cheese and add more salt if desired. If you want your cream cheese any thinner, strain/drain it in cheesecloth or paper towel or a fine mesh colander for about 30 minutes to strain off any extra liquid. Tips for Success See what I mean about how the majority of this process is just waiting? That said, I do have some extra tips on how to create the best possible homemade vegan cream cheese: Variation Ideas If plain cream cheese isn’t your thing, that’s okay! You can always jazz it up with some add-ins. These are a few of my favorite variations when it comes to cream cheese: Ways to Use It There are practically endless ways to use cream cheese in your daily life! Here are a few of my favorite ways: How to Store Homemade Cream Cheese Keep your homemade cream cheese in an airtight container/jar in the fridge, for up to 5 days. You can also freeze it for a month or so, but note that it will lose some of its creaminess. The Best Vegan Cream Cheese Learn how to make creamy Vegan Cream Cheese with this easy step-by-step guide! Homemade cream cheese is so rich and smooth. It’s perfect for breakfast bagels, snacks, and more! by: Jessica in the Kitchen Prep Time 10 minutesTotal Time 2 days 10 minutesIn a high speed blender, blend all the ingredients together until blended and completely creamy, smooth and incorporated. Scrape down the sides if needed, and blend to combine. I prefer to use a smaller blender for this, and a tamper to get all of the ingredients mixed in.Pour the contents into a very clean and dry glass bowl or tall jar using a silicone spatula or wooden spatula (not metal). Smooth it down.Cover the bowl/jar with some cheesecloth or even a clean dry paper towel and secure with a rubber band. Place in a warm, dry place. If you live in a tropical country, you can leave it on your countertop. If you don’t, place it in your oven with the oven OFF and the oven light on (do not place it right after cooking something, this will be too hot). Leave the cream cheese undisturbed as much as possible for 24-48 hours. I recommend leaving it for the full 48 hours. If you see a small slightly yellow film on top that is normal. If you see any pink spots, that is mold and you should discard it all. This will usually happen if some of your equipment isn’t clean, so give it all a good scrub before using.The mix should be much thicker now and taste a lot cheesier. Stir to combine fully. Cover the jar/bowl or transfer to a new clean jar/bowl and cover and place in your fridge. It should also thicken up in the fridge and you can start using it now!Taste your cream cheese and add more salt if desired. If you want your cream cheese any thinner, strain/drain it in cheesecloth or paper towel or a fine mesh colander for about 30 minutes to strain off any extra liquid. Calories: 126kcal | Carbohydrates: 7g | Protein: 4g | Fat: 10g | Saturated Fat: 2g | Polyunsaturated Fat: 2g | Monounsaturated Fat: 5g | Cholesterol: 1mg | Sodium: 201mg | Potassium: 160mg | Fiber: 1g | Sugar: 2g | Vitamin A: 10IU | Vitamin C: 1mg | Calcium: 20mg | Iron: 1mg by JessicaIf you like making your own vegan condiments and spreads, take a look at the following recipes:


More Stories
15 Vegan Cheese Brands Doing Dairy Better Than Dairy
Macaroni & Cheese For 100 Recipe | CDKitchen.com
Danish Startup Leverages Dairy Industry Know-How To Make Realistic Vegan Cheese