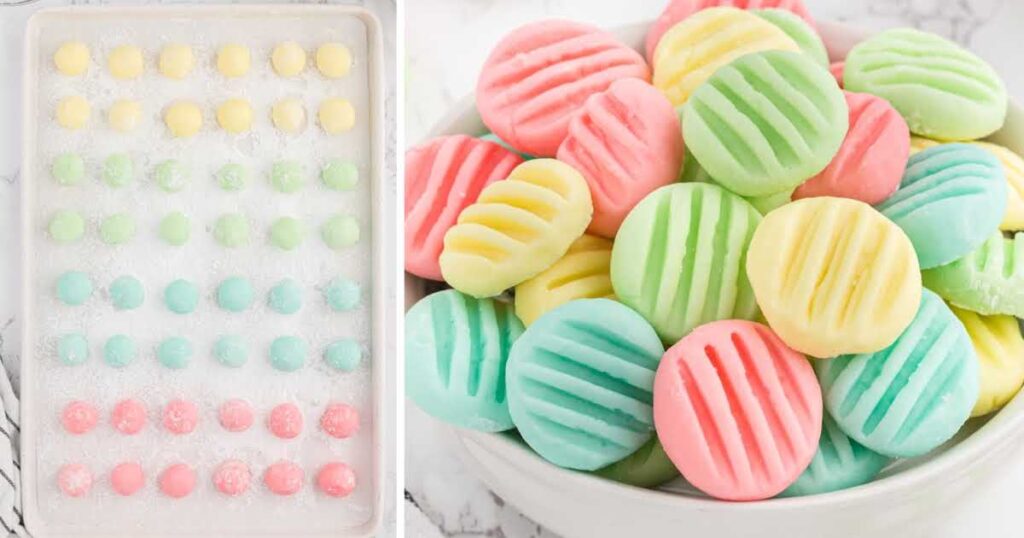
Homemade cream cheese mints have such a creamy soft texture and pretty colors, they will be a welcome addition to any event you serve them at.Melt-in-your-mouth cream cheese mints are such a delightful and old-fashioned confection that is always a welcome addition to any dessert table. They’re the perfect sweet and creamy treat with an irresistible minty flavor, and you can customize their color to match any season or holiday. Cream Cheese Mints Ingredients You’ll need: SUBSTITUTIONS AND ADDITIONS FLAVOR: You can substitute other flavors for the mint flavoring, such as strawberry for the pink, watermelon for the green, and banana for the yellow in this easy recipe. How to Make This Cream Cheese Mints Recipe OUR RECIPE DEVELOPER SAYS You can use small silicone candy molds for cute, shaped mints. Dry the same as directed below. STEP ONE: In the bowl of a stand mixer or a large bowl with a hand mixer on medium-high speed, beat together the softened cream cheese and softened butter for 1½ to 2 minutes, until smooth. PRO TIP: Make sure your cream cheese is at room temperature to ensure the mint mixture doesn’t have any lumps in it. STEP TWO: Add the peppermint and vanilla extract, and continue mixing for another 1 to 1½ minutes. STEP THREE: Lower the electric mixer speed to low. Add the powdered sugar 1 cup at a time, mixing well after each cup. Once all the powdered sugar has been added, increase the mixer speed to medium-high and continue mixing for 1 more minute until completely smooth. STEP FOUR: Evenly divide the cream cheese mixture into 4 separate bowls. STEP FIVE: Add 3 to 6 drops of 1 color to the first bowl and stir until the color is even and no streaks are visible. Repeat the process with the remaining colors in the remaining bowls. Cover with plastic wrap and chill in the refrigerator for 1 hour. PRO TIP: The amount of food color gel used is up to you, depending on how deep you want each color to be. Using 3 to 4 drops is usually enough to achieve the delicate pastel color traditionally associated with these mints. STEP SIX: Add 1 cup of powdered sugar to a medium-sized mixing bowl. STEP SEVEN: Line a cookie sheet with parchment paper. Sprinkle a dusting of powdered sugar onto the parchment paper. STEP EIGHT: Using a 1 tablespoon cookie scoop, scoop the tinted cream cheese mixture. Roll into a ball. Cut the rolled ball in half. Roll the 2 halves into smaller balls, and then roll in the powdered sugar. Place the coated ball on the prepared baking sheet. PRO TIP: We used at least 1 full tablespoon of the rolled/pressed mint and found it just was too big. It was handy to use the tablespoon scoop and then cut the little balls in half. It worked like a charm! STEP NINE: Gently press the tines of a fork on top of the coated ball. If the fork sticks to the ball, you can dip the fork in the powdered sugar. Repeat the process until all colors are coated and pressed. PRO TIP: You could also swirl the mint colors together when rolling the mints into the halved balls. STEP TEN: Allow the pressed mints to dry on the coated parchment paper for at least 4 hours. If the weather is humid, once the tops of the mints are dried, you will need to turn the mints over and even transfer them to a drying rack to allow the softer side to finish drying. How To Serve You may have seen these dreamy pastel mints at baby showers, bridal showers, graduation parties, weddings, or at another special occasion. They are one of the easiest holiday candy recipes, and these little treats can be tinted in different colors to match the event. These yummy mints would also make a sweet gift added to a pretty gift box tied with a pretty ribbon. These little mints are not the only confections we love to make. Our Martha Washington candy and jello divinity are two more favorites to try. ON THE COUNTER: Store any leftovers of these homemade mints in an airtight container at room temperature for up to 2 weeks. Make sure to separate the layers of mints using wax paper. IN THE FREEZER: You can freeze these cream cheese butter mints in an airtight container for up to 2 months. Again, be sure to separate the layers with a piece of wax paper. These delicious cream cheese mints are a delight any time of year and will be a huge hit for anyone you serve them to. Be careful, they are slightly addictive, and you may not be able to resist once you pop the first one in your mouth. FREQUENTLY ASKED QUESTIONS How do I store these mints? This simple recipe can be stored on the counter for up to two weeks in an airtight container. This simple recipe can be stored on the counter for up to two weeks in an airtight container. Can I use silicone molds to shape these mints This easy cream cheese mints recipe could also be made in silicone molds to create fun shapes if you prefer. This easy cream cheese mints recipe could also be made in silicone molds to create fun shapes if you prefer. Can I use different extract flavors for these mints? The sky’s the limit for these mints. Any flavor of extract you can think of would be a great idea to try out for these creamy mints. The sky’s the limit for these mints. Any flavor of extract you can think of would be a great idea to try out for these creamy mints. Subscribe now to receive our FREE Sweet & Treats digital cookbook with 15 amazing desserts inside!Homemade cream cheese mints have such a creamy soft texture and pretty colors, they will be a welcome addition to any event you serve them at. Prep Time 15 minutesTotal Time 5 hours 15 minutesUsing either a stand mixer or a handheld mixer on medium-high speed, beat together the softened cream cheese and softened butter for 1½ to 2 minutes, until smooth.Add the peppermint and vanilla extract, and continue mixing for another 1 to 1½ minutes.Lower the mixer speed to low. Add the powdered sugar 1 cup at a time, mixing well after each cup. Once all the powdered sugar has been added, increase the mixer speed to medium-high and continue mixing for 1 more minute until completely smooth.Evenly divide the cream cheese mixture into 4 bowls.Add 3 to 6 drops of 1 color to the first bowl, stir until the color is even and no streaks are visible. Repeat the process of the remaining colors in the remaining bowls. Cover with plastic wrap and chill in the refrigerator for 1 hour.Add the 1 cup of powdered sugar to a medium-size mixing bowl.Line a baking sheet with parchment paper. Sprinkle a dusting of powdered sugar onto the parchment paper.Using a 1 tablespoon cookie scoop, scoop the tinted cream cheese mixture. Roll into a ball. Cut the rolled ball in half. Roll the 2 halves into smaller balls, and then roll in the powdered sugar. Place the coated ball on the prepared baking sheet.Gently press the fork tines on top of the coated ball. If the fork sticks to the ball, you can dip the fork in the powdered sugar. Repeat the process until all colors are coated and pressed.Allow the pressed mints to dry on the coated parchment paper for at least 4 hours. If the weather is humid, once the tops of the mints are dried, you will need to turn the mints over and even transfer them to a drying rack to allow the softer side to finish drying.Calories: 42kcal | Carbohydrates: 9g | Protein: 0.1g | Fat: 1g | Saturated Fat: 1g | Polyunsaturated Fat: 0.05g | Monounsaturated Fat: 0.3g | Trans Fat: 0.02g | Cholesterol: 3mg | Sodium: 10mg | Potassium: 3mg | Sugar: 8g | Vitamin A: 40IU | Calcium: 2mg | Iron: 0.01mg Have You Tried This Recipe?Follow me on Pinterest @spaceshipslb


More Stories
15 Vegan Cheese Brands Doing Dairy Better Than Dairy
Macaroni & Cheese For 100 Recipe | CDKitchen.com
Danish Startup Leverages Dairy Industry Know-How To Make Realistic Vegan Cheese